Tekno Info

Friday, 7 November 2014

1. Cara Allow/WhiteList pada BruteForce Protection
Pertama, silakan Login dahulu ke WHM menggunakan akses root password. Lalu, silakan akses menu “cPHulk Brute Force Protection” atau pada menu pencarian (kiri-atas) bisa menuliskan keyword “brute” seperti pada gambar berikut :
Capture

Lalu, silakan klik Tab “White/Black List Management” seperti gambar berikut :
Capture1
Pada kolom “White List (Trusted IP List)“, silakan isikan IP ISP yang akan di Allow lalu klik button “Quick Add” seperti pada gambar berikut :
Capture2

Selesai,,, :D
2. Cara Allow/WhiteList pada CSF (Firewall)
Pertama, silakan Login dahulu ke WHM menggunakan akses root password. Lalu, silakan akses menu “ConfigServer Security & Firewall – csf”  atau pada menu pencarian (kiri-atas) bisa menuliskan keyword “fire” seperti pada gambar berikut :
Capture3-1

Lalu, silakan klik Tab “Quick Allow” dan pada kolom yang berwarna dasar hijau silakan isikan IP, lalu tekan button “Quick Allow”, seperti gambar berikut :
Capture4-1


Selesai,,, :D
ga bisa login ke cpanel? karna brutefoce (salah memasukan password berulang kali)
cara nya gampang, login ke ssh masukin comand di bawah ini buat hapus brute force nya,
# echo “delete from brutes; delete from logins;” | mysql cphulkd

atau dengan login ke whm

 steps : WHM >> Security >> Security Center >> cPHulk Brute Force Protection.
lalu klik flus DB untuk menghapus IP yang terblack list


sumur diladang : https://documentation.cpanel.net/display/ALD/cPHulk+Brute+Force+Protection
Installation
============
Installation is quite straightforward:

rm -fv csf.tgz
wget http://www.configserver.com/free/csf.tgz
tar -xzf csf.tgz
cd csf
sh install.sh

Next, test whether you have the required iptables modules:

perl /usr/local/csf/bin/csftest.pl

Don't worry if you cannot run all the features, so long as the script doesn't
report any FATAL errors

You should not run any other iptables firewall configuration script. For
example, if you previously used APF+BFD you can remove the combination (which
you will need to do if you have them installed otherwise they will conflict):

sh /usr/local/csf/bin/remove_apf_bfd.sh

That's it. You can then configure csf and lfd by reading the documentation and
configuration files in /etc/csf/csf.conf and /etc/csf/readme.txt directly or
through the csf User Interface.

csf installation for cPanel and DirectAdmin is preconfigured to work on those
servers with all the standard ports open.

csf auto-configures your SSH port on installation where it's running on a non-
standard port.

csf auto-whitelists your connected IP address where possible on installation.

You should ensure that kernel logging daemon (klogd) is enabled. Typically, VPS
servers running RedHat/CentOS v5 have this disabled and you should check
/etc/init.d/syslog and make sure that any klogd lines are not commented out. If
you change the file, remember to restart syslog.

See the csf.conf and readme.txt files for more information.


Webmin Module Installation/Upgrade
==================================

To install or upgrade the csf webmin module:

Install csf as above
Install the csf webmin module in:
  Webmin > Webmin Configuration > Webmin Modules >
  From local file > /usr/local/csf/csfwebmin.tgz > Install Module


Uninstallation
==============
Removing csf and lfd is even more simple:

cd /etc/csf
sh uninstall.sh


GD::Graph
=========
This perl module is required for Statistical Graphs available from the csf UI.
It is dependent on garphical libraries being installed for your OS (e.g.
libgd, libpng, etc. which is beyond the scope of this document)

The perl module itself can be installed in a variety of ways, e.g.:

RedHat/CentOS/CloudLinux:
# yum install perl-GDGraph

Debian v6:
# apt-get install libgd-graph-perl

Direct from cpan.org:
# perl -MCPAN -e shell
cpan> install GD::Graph

Proses instalasi Kloxo berbeda tergantung pada apakah Anda sudah setup MySQL. Jika Anda telah menginstal MySQL dan menetapkan password root, skip langkah kedua. Jika tidak, lanjutkan di bawah ini. Anda perlu login ke VPS anda sebagai user root untuk menginstal Kloxo.

# yum install -y wget

# wget http://download.lxcenter.org/download/kloxo/production/kloxo-installer.sh

# sh ./kloxo-installer.sh –type=master

Jika MySQL sudah terinstal dengan set password root:

# yum install -y wget

# wget http://download.lxcenter.org/download/kloxo/production/kloxo-installer.sh

# sh ./kloxo-installer.sh –type= –db-rootpassword=PASSWORD


Setelah setup selesai, Anda dapat mengkonfigurasi Kloxo di: http://xx.xx.xx.xx:7778 (Masuk dengan username: admin dan password: admin)

Sumur : https://metroworldhost.com/cara-install-kloxo-pada-rhel-atau-centos-vps/

Update centos dulu,
setelah update download paket nginx nya, lalu install nginx
# yum update
# rpm -Uvh http://download.fedora.redhat.com/pub/epel/5Server/x86_64/epel-release-5-4.noarch.rpm
# yum install nginx
Start Nginx:
# /etc/init.d/nginx start
Periksa apakah Nginx berjalan pada: http://xx.xx.xx.xx - Anda akan melihat halaman default Nginx.
Set Nginx untuk memulai secara otomatis dalam kasus reboot:
# /sbin/chkconfig nginx on

Friday, 28 February 2014

Step # 1: First get disk space:

$ df -H
Output:
Filesystem             Size   Used  Avail Use% Mounted on
/dev/hdb1               20G    14G   5.5G  71% /
tmpfs                  394M   4.1k   394M   1% /dev/shm
/dev/hdb5               29G    27G   654M  98% /nas/www

Step # 2: Next filter out filesystem and find out the percentage of space

$ df -H | grep -vE '^Filesystem|tmpfs|cdrom' | awk '{ print $5 " " $1 }'
Output:
71% /dev/hdb1
98% /dev/hdb5

Step # 3: Write a shell script

Above command displays field 5 and 1 of df command. Now all you need to do is write a script to see if the percentage of space is >= 90% (download script):
#!/bin/sh
df -H | grep -vE '^Filesystem|tmpfs|cdrom' | awk '{ print $5 " " $1 }' | while read output;
do
  echo $output
  usep=$(echo $output | awk '{ print $1}' | cut -d'%' -f1  )
  partition=$(echo $output | awk '{ print $2 }' )
  if [ $usep -ge 90 ]; then
    echo "Running out of space \"$partition ($usep%)\" on $(hostname) as on $(date)" |
     mail -s "Alert: Almost out of disk space $usep%" you@somewhere.com
  fi
done

Setup Cron job

Save and install script as cronjob. Copy script to /etc/cron.daily/ (script downolad link)
# cp diskAlert /etc/cron.daily/
# chmod +x /etc/cron.daily/diskAlert

OR install as cronjob:
crontab -e
Write cronjob as per your requirement
10 0 * * * /path/to/diskAlert

Updated script version

Tony contributed and updated my script - You can exclude selected filesystem in case you don't want monitor all filesystems.
#!/bin/sh
# set -x
# Shell script to monitor or watch the disk space
# It will send an email to $ADMIN, if the (free available) percentage of space is >= 90%.
# -------------------------------------------------------------------------
# Set admin email so that you can get email.
ADMIN="root"
# set alert level 90% is default
ALERT=90
# Exclude list of unwanted monitoring, if several partions then use "|" to separate the partitions.
# An example: EXCLUDE_LIST="/dev/hdd1|/dev/hdc5"
EXCLUDE_LIST="/auto/ripper"
#
#::::::::::::::::::::::::::::::::::::::::::::::::::::::::::::::::::::::::::::::::::::::::::::::::::::::::
#
function main_prog() {
while read output;
do
#echo $output
  usep=$(echo $output | awk '{ print $1}' | cut -d'%' -f1)
  partition=$(echo $output | awk '{print $2}')
  if [ $usep -ge $ALERT ] ; then
     echo "Running out of space \"$partition ($usep%)\" on server $(hostname), $(date)" | \
     mail -s "Alert: Almost out of disk space $usep%" $ADMIN
  fi
done
}
if [ "$EXCLUDE_LIST" != "" ] ; then
  df -H | grep -vE "^Filesystem|tmpfs|cdrom|${EXCLUDE_LIST}" | awk '{print $5 " " $6}' | main_prog
else
  df -H | grep -vE "^Filesystem|tmpfs|cdrom" | awk '{print $5 " " $6}' | main_prog
fi

Wednesday, 19 February 2014

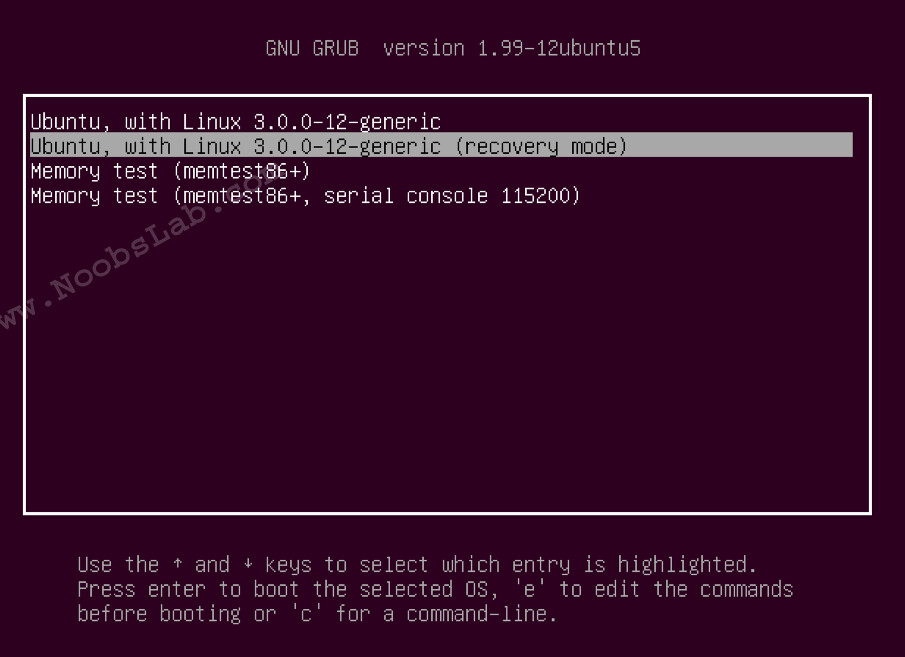
So First Step is Boot in to Recovery Mode:

ubuntu password

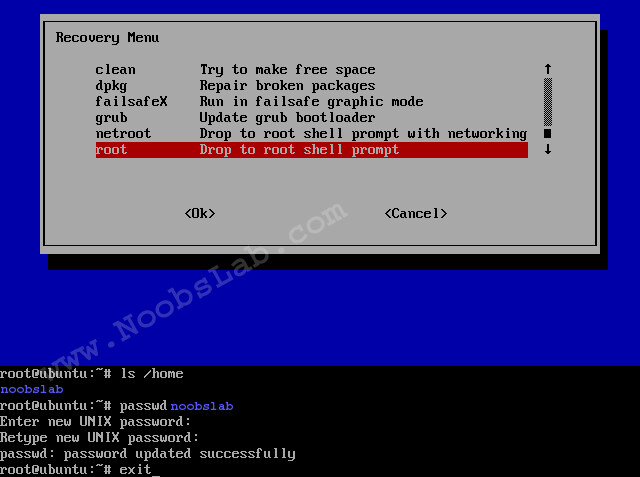
You will see the following screen. Now select "root - Drop to root shell prompt" and press "Ok"


Ubuntu reset password

Here is video tutorial

If you forgot your username enter this command to know:


In linux case is sensitive about username and password, If you have upper case than you need to enter same letters.
Mount root with following command:


Now Enter following command to reset your password:


For example (See the picture above):


Now enter your new password and confirm it.
Reboot pc:


That's it.

Sumber