Tekno Info

Wednesday, 19 February 2014

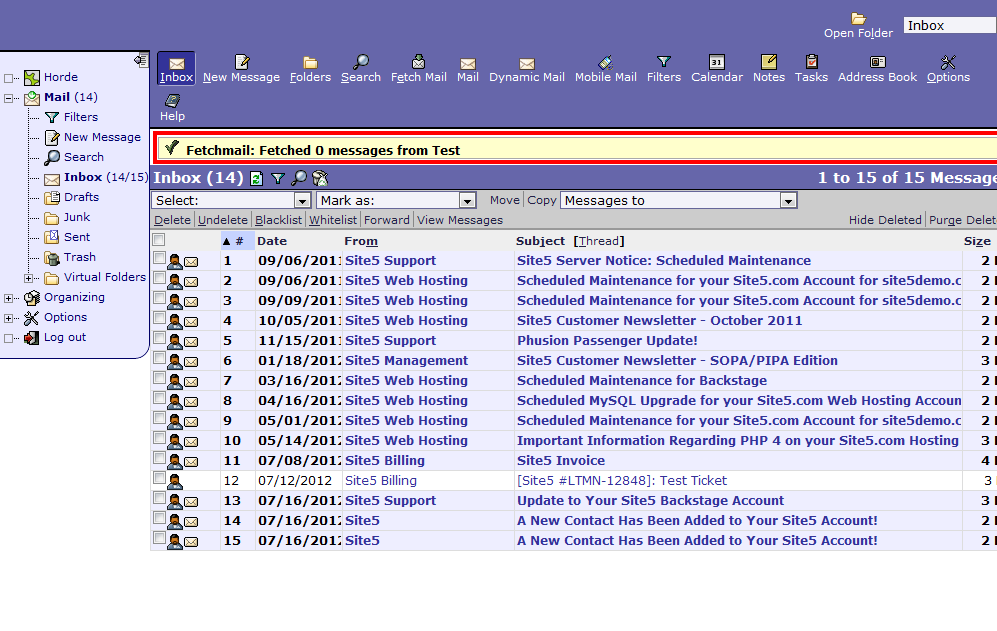
  • 1) Login to Horde
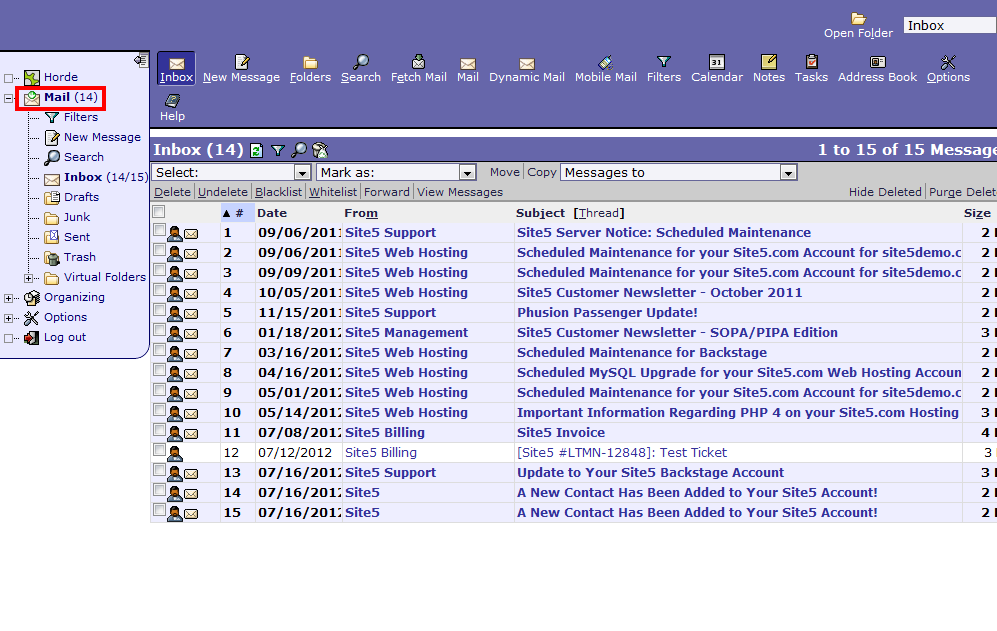
  • 2) Select the mail folder from the left-hand menu
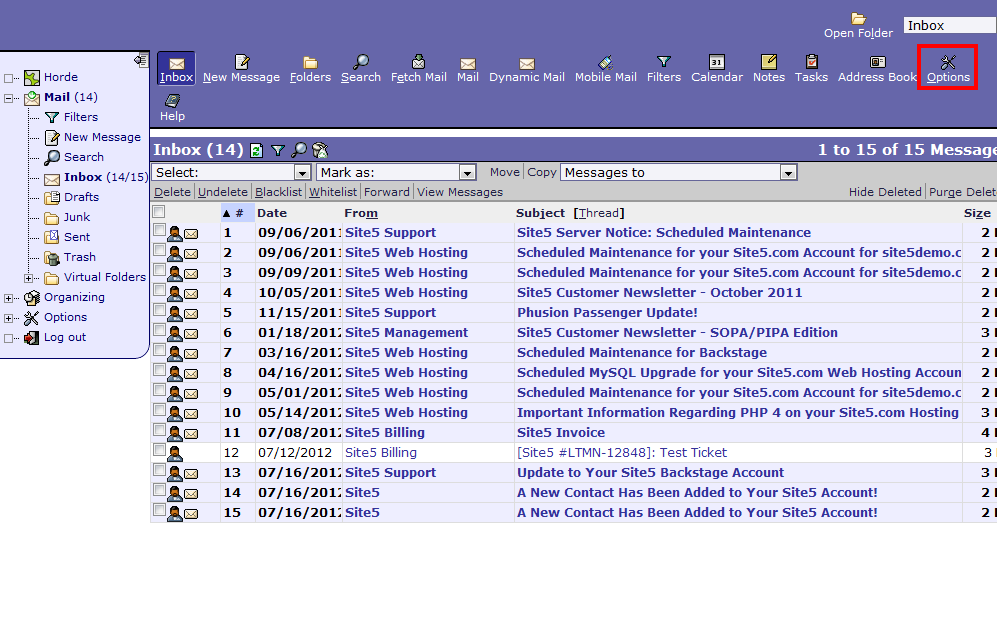
  • 3) Push the options button located in the top menu
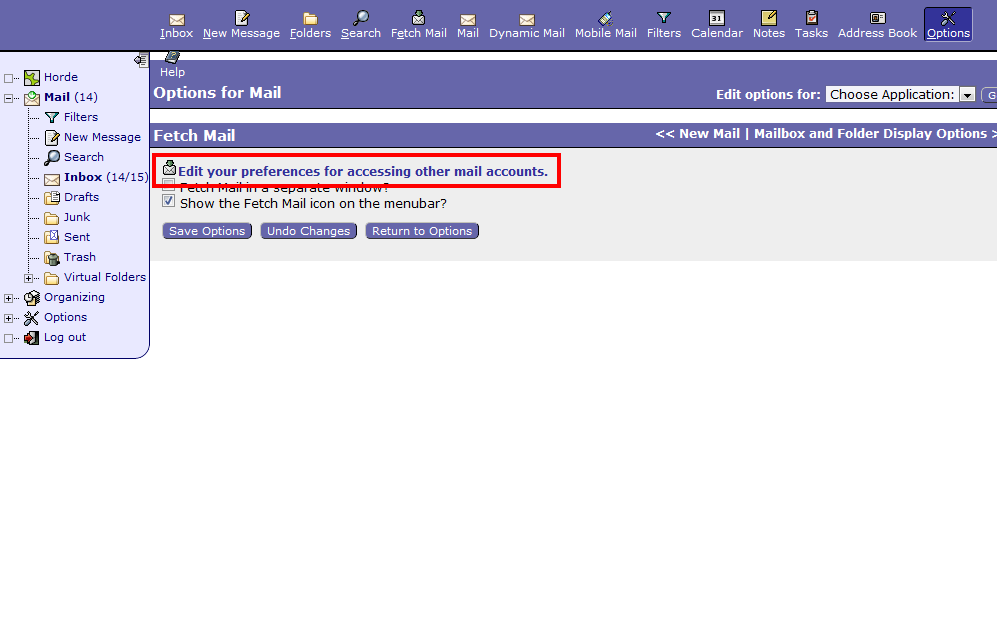
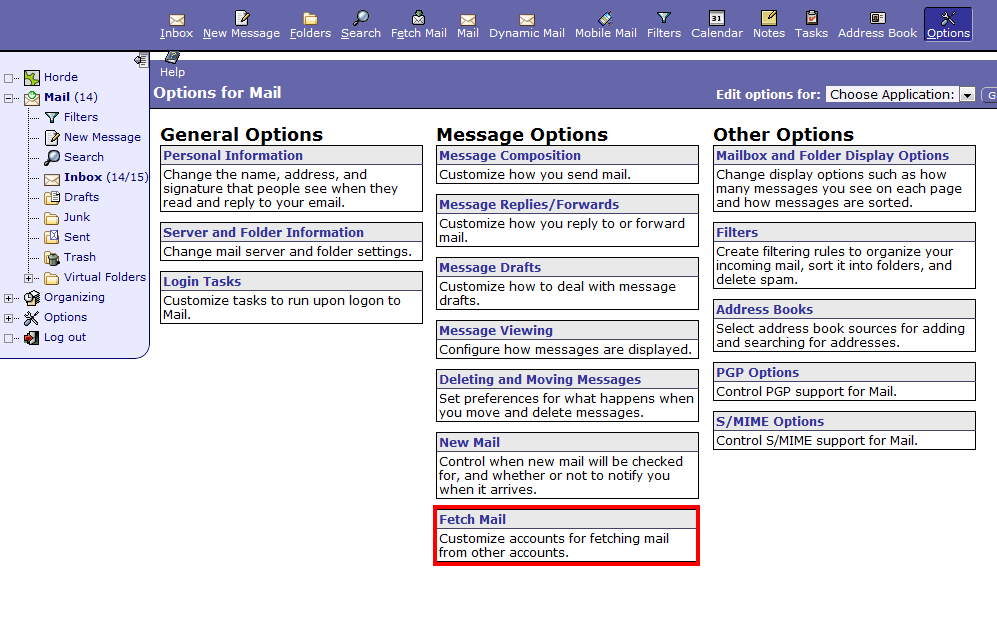
  • 4) Click the Fetch Mail link
  • 5) Click the Edit your preferences for accessing other mail accounts link
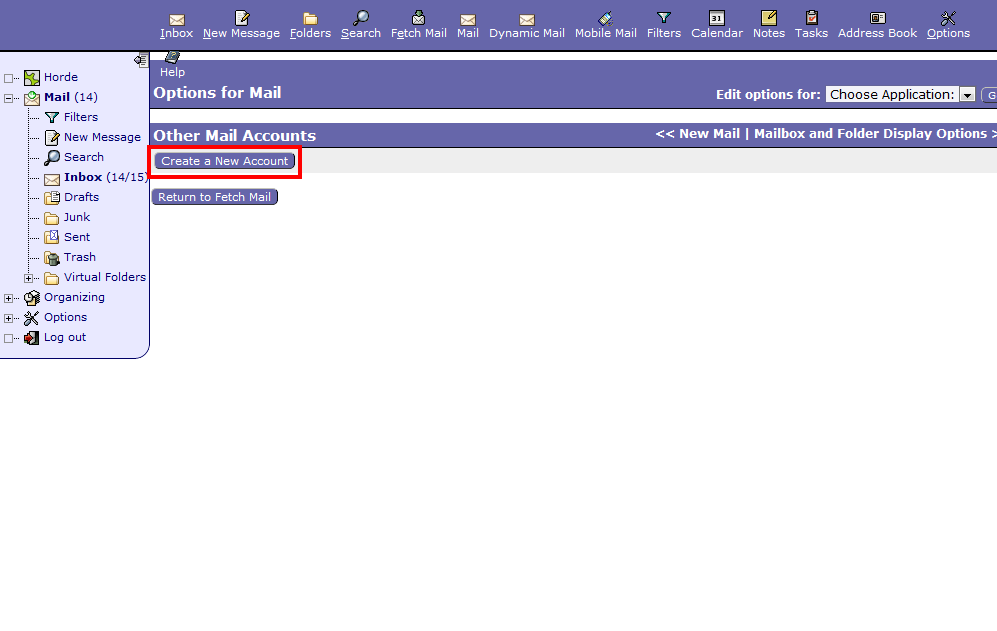
  • 6) Click the Create a New Account button
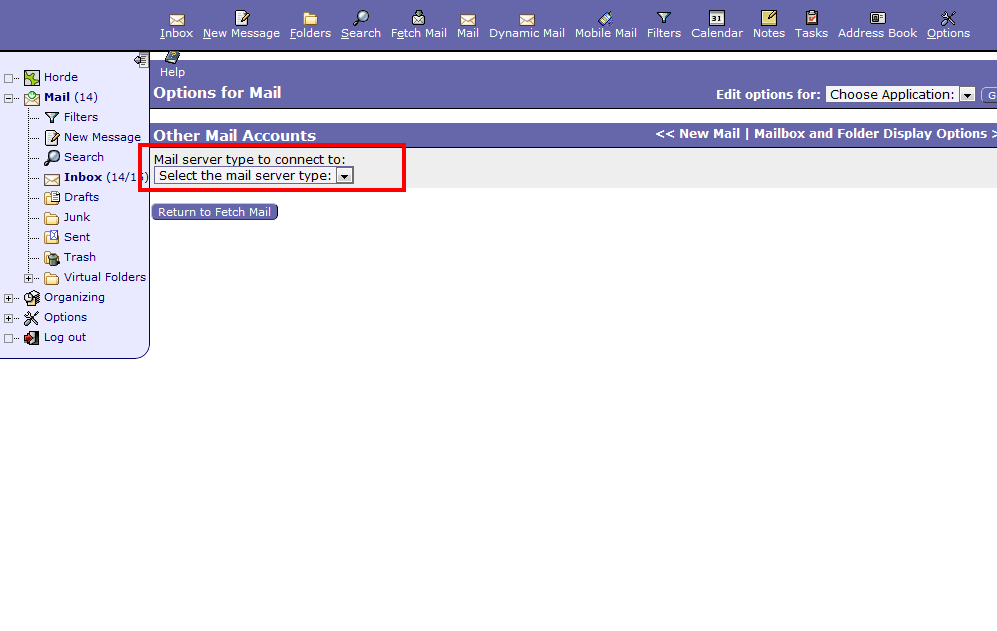
  • 7) Pick IMAP/POP3 Mail Servers from the Mail server type drop-down
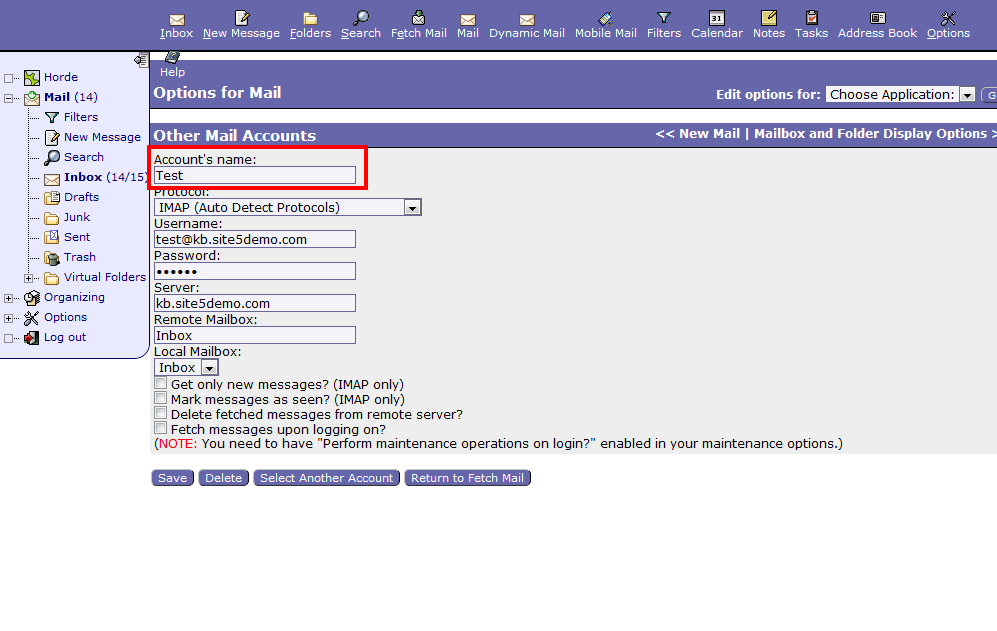
  • 8) Enter the account name you wish to use
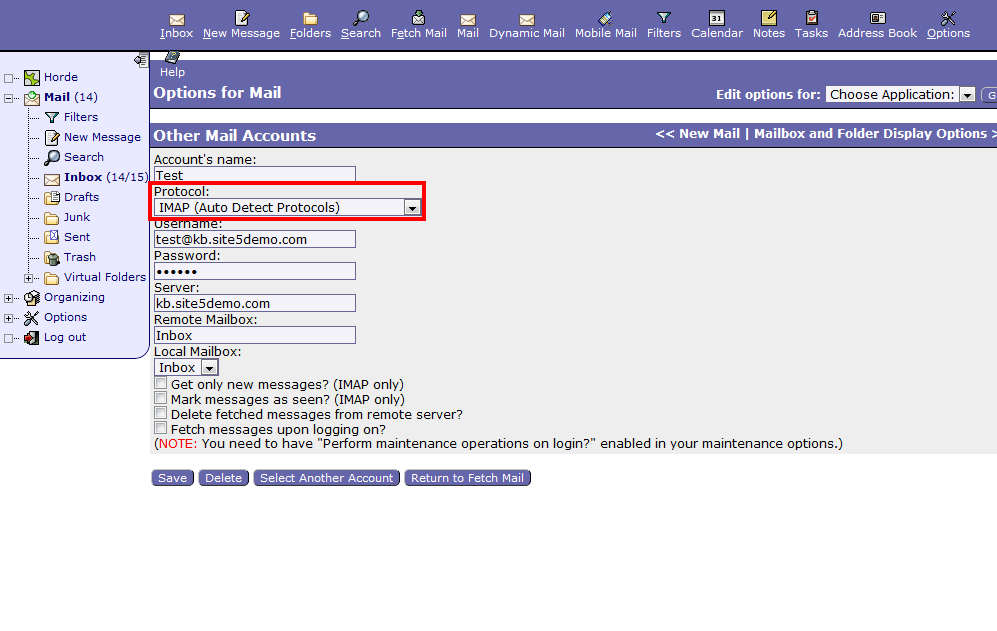
  • 9) Select the protocol you wish to use (contact your old host for this information).
In most situations IMAP (Auto Detect Protocols) or POP3 (Auto Detect Protocols) will work fine. We recommend that you try to use IMAP if possible.

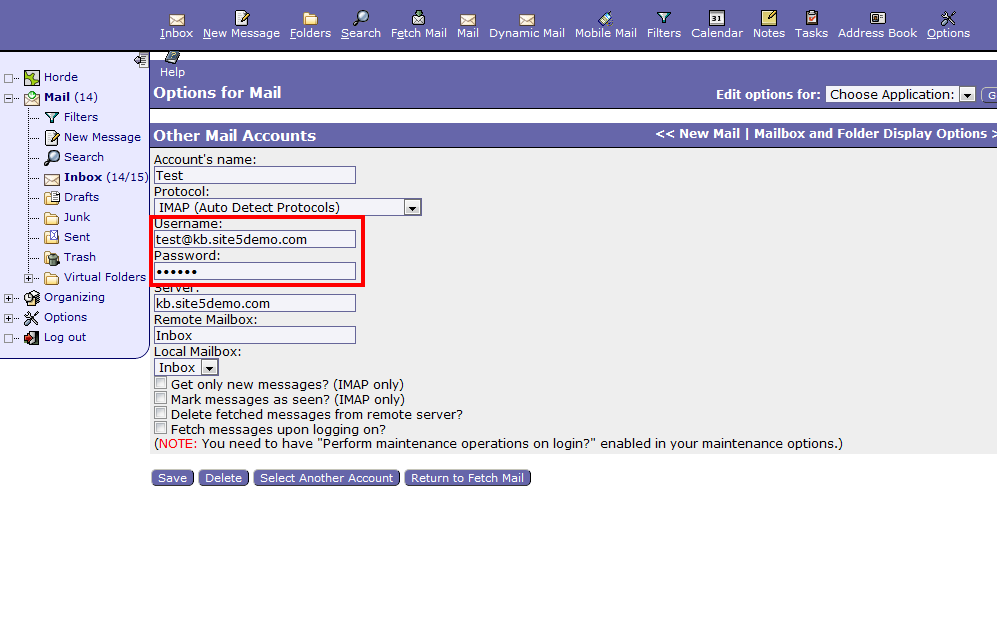
  • 10) Enter the username and password for the account you are copying your emails from.
     
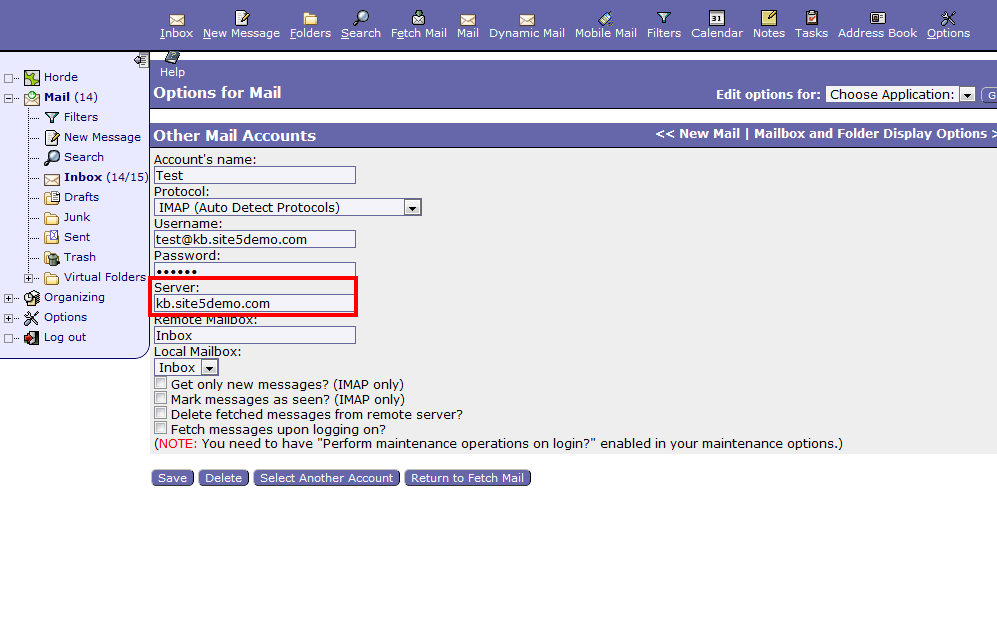
  • 11) Enter the server host-name for the old host. (contact your old host for this information)
     
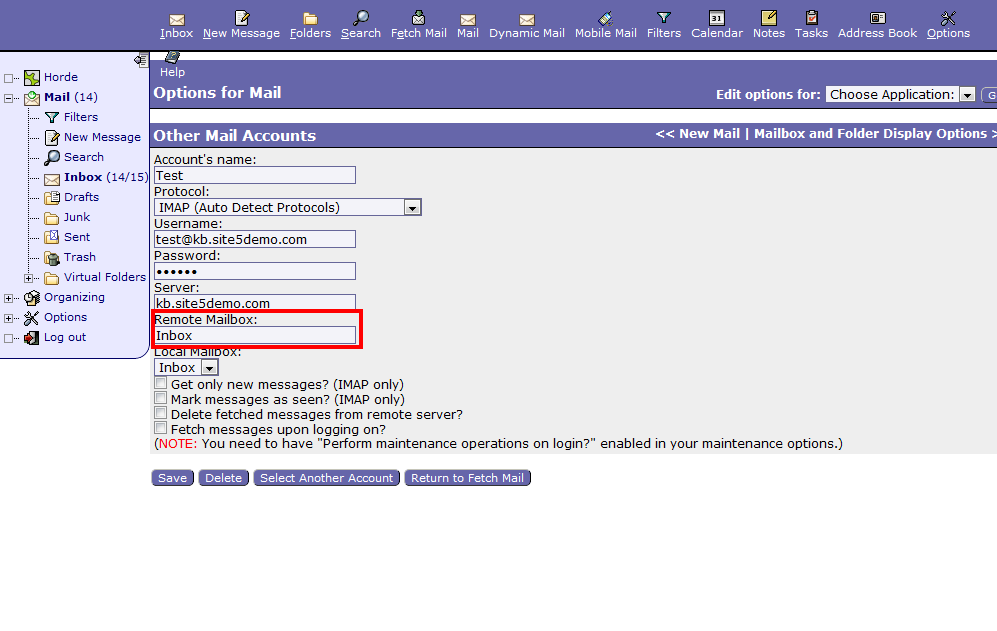
  • 12) Enter the Remote Mailbox (folder) that contains the emails you wish to move. In most situations, you can simply input Inbox
     
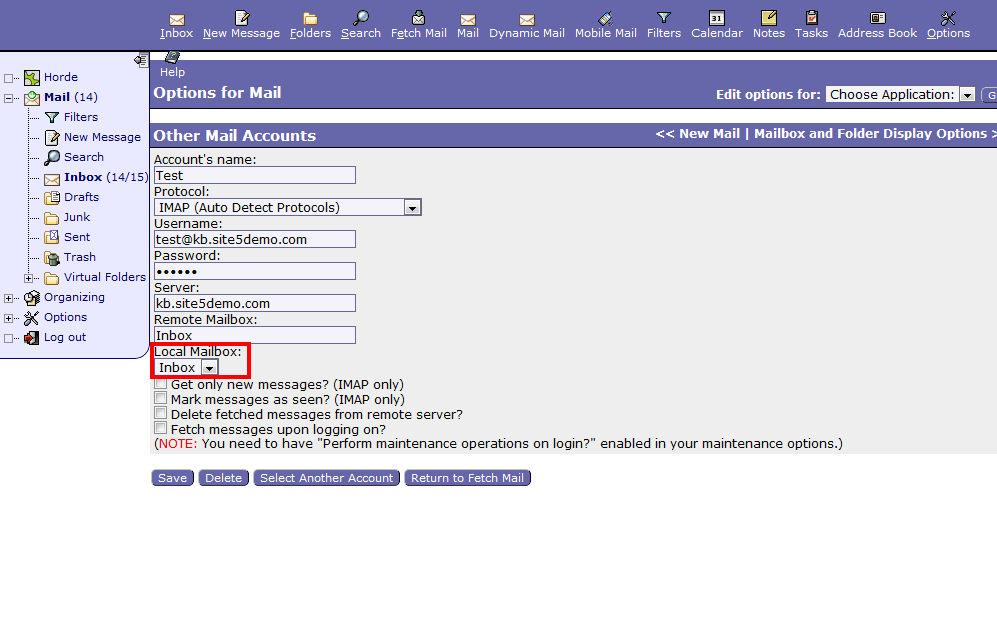
  • 13) Select the local mailbox (folder) you wish to put the moved emails.
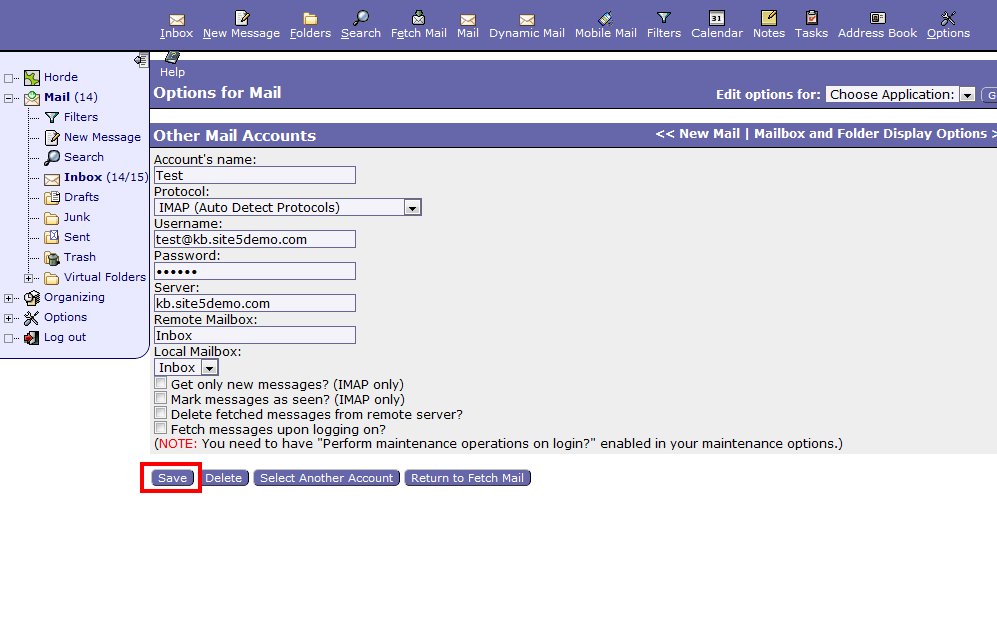
  • 14) Click create/save
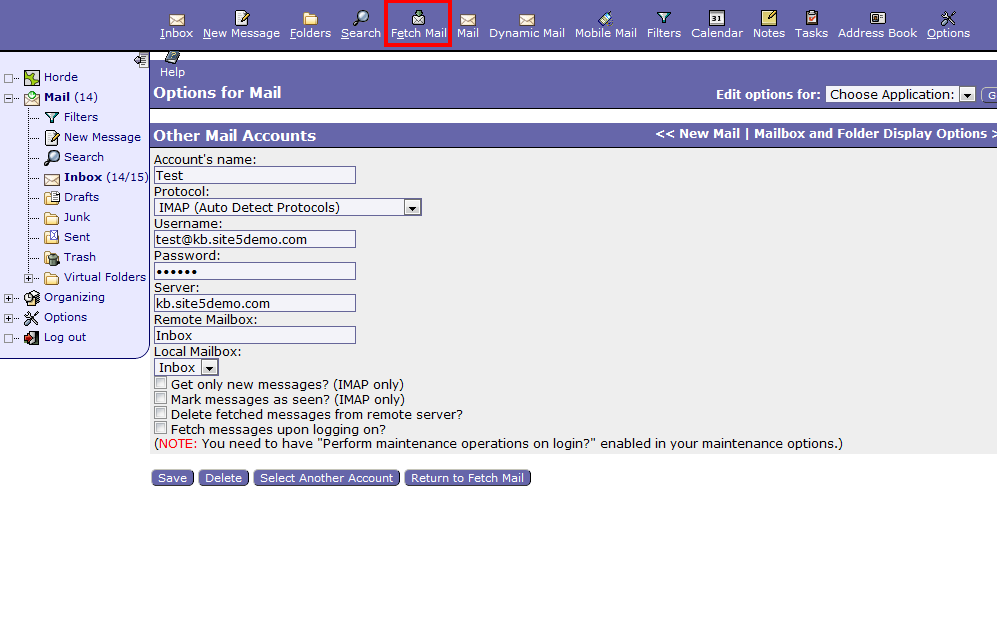
  • 15) Click the Fetch Mail button located in the top menu
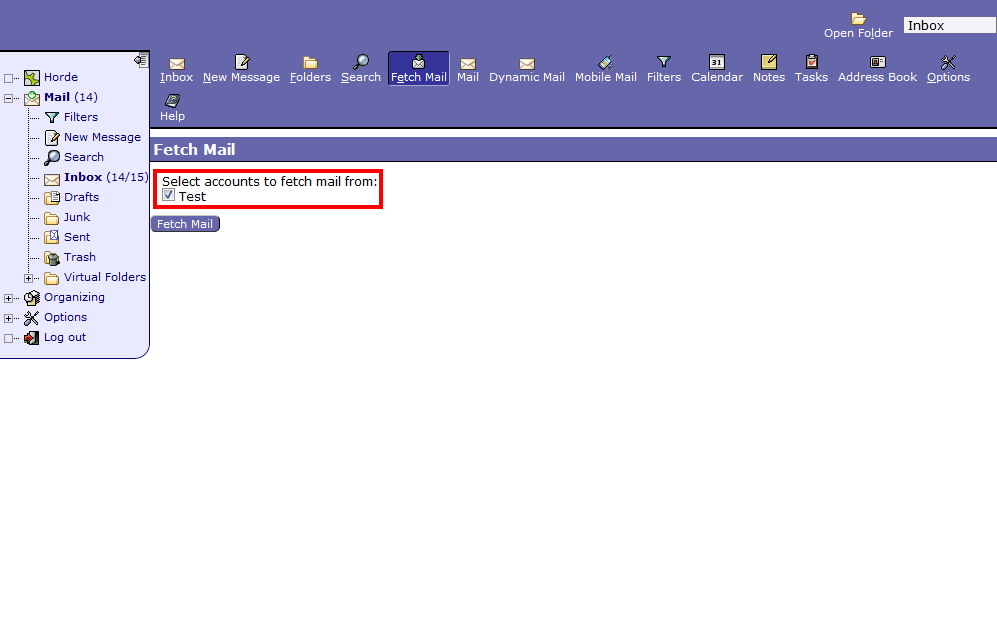
  • 16)  Check the corresponding boxes next to the account(s) you wish to import
  • 17)  Click the Fetch Mail button
  • 18) That’s it! You have now imported all the emails located in the mailbox you picked in step 12 from your old host.
By Under: CentOS, Fedora, Linux Distros, Open Source, RedHat On: July 14, 2012
Download Your Free eBooks NOW - 10 Free Linux eBooks for Administrators
Guys, if you are a regular reader of tecmint.com you will notice that this is our third article on security tools. In our previous both articles we have given you all the guidance in how to secure Apache and Linux Systems from Malware, DOS and DDOS attacks using mod_security and mod_evasive and LMD (Linux Malware Detect). Again we are here to introduce a new security tool called Rkhunter. This article will guide you a way to install and configure RKH (RootKit Hunter) in RHEL 6.3/6.2/6.1/6/5.8, CentOS 6.3/6.2/6.1/6/5.8 and Fedora 12,13,14,15,16,17 systems using source code.
Install Rkhunter in Linux

Install Rkhunter in Linux

What Is Rkhunter?

Rkhunter (Rootkit Hunter) is an open source Unix/Linux based scanner tool for Linux systems released under GPL that scans backdoors, rootkits and local exploits on your systems. It scans hidden files, wrong permissions set on binaries, suspicious strings in kernel etc. To know more about Rkhunter and its features visit http://www.rootkit.nl/.
Install Linux Rkhunter (Rootkit Hunter) in RHEL 6.3/6.2/6.1/6/5.8, CentOS 6.3/6.2/6.1/6/5.8 and Fedora 12,13,14,15,16,17

Installing Rkhunter (Rootkit Hunter) in RHEL, CentOS and Fedora

Step 1: Downloading Rkhunter

First download the latest stable version of Rkhunter tool by going to http://www.rootkit.nl/projects/rootkit_hunter.html or use below Wget command to download it on your systems.
# cd /tmp
# wget http://ncu.dl.sourceforge.net/project/rkhunter/rkhunter/1.4.0/rkhunter-1.4.0.tar.gz

Step 2: Installing Rkhunter

Once you have downloaded the latest version, run the following commands as a root user to install it.
# tar -xvf rkhunter-1.4.0.tar.gz
# cd rkhunter-1.4.0
# ./installer.sh --layout default --install

Step 3: Updating Rkhunter

Run the RKH updater to fill the database properties by running the following command.
# /usr/local/bin/rkhunter --update
# /usr/local/bin/rkhunter --propupd

Step 4: Setting Cronjob and Email Alerts

Create a file called rkhunter.sh under /etc/cron.daily/, which then scans your file system every day and sends email notifications to your email id. Create following file with the help of your favourite editor.
# vi /etc/cron.daily/rkhunter.sh
Add the following lines of code to it and replace “YourServerNameHere” with your “Server Name” and “your@email.com” with your “Email Id“.
#!/bin/sh
(
/usr/local/bin/rkhunter --versioncheck
/usr/local/bin/rkhunter --update
/usr/local/bin/rkhunter --cronjob --report-warnings-only
) | /bin/mail -s 'rkhunter Daily Run (PutYourServerNameHere)' your@email.com
Set execute permission on the file.
# chmod 755 /etc/cron.daily/rkhunter.sh

Step 5: Manual Scan and Usage

To scan the entire file system, run the Rkhunter as a root user.
# rkhunter --check
The above command generates log file under /var/log/rkhunter.log with the checks results made by Rkhunter. For more information and options please run the following command.
# rkhunter --help
If you liked this article, then sharing is the right way to say thanks.
Sumber
Instal rkhunter dari Source


Karena repositori Ubuntu memiliki versi lama dari rkhunter yang berisi bug unpatched, kita akan menginstal dari source sehingga program berjalan dengan baik.


Ubah ke direktori home Anda dan men-download file. Pada tulisan ini, 1.4.0 adalah versi terbaru, tetapi Anda bisa pergi ke halaman rumah proyek untuk melihat apakah versi yang lebih baru tersedia:


cd
wget http://downloads.sourceforge.net/project/rkhunter/rkhunter/1.4.0/rkhunter-1.4.0.tar.gz

Setelah itu telah selesai di-download, ekstrak file dan masuk ke direktori yang dihasilkan:

tar xzvf rkhunter*
cd rkhunter* 


setelah kita masuk ke dalam subfolder tersebut baru lah kita install

sudo ./installer.sh --layout /usr --install

setelah menginstall kita perlu mengupdate repositori agar utilities berjalan semua fungsi nya

sudo apt-get update
sudo apt-get install binutils libreadline5 libruby1.8 ruby ruby1.8 ssl-cert unhide.rb mailutils

Anda akan ditanya beberapa pertanyaan tentang setup server mail. Anda dapat mengkonfigurasi ini jika Anda ingin, tapi untuk singkatnya, kita tidak akan mengkonfigurasi web server menghadap mail. Pilih "hanya lokal" untuk mengikuti contoh kita. 

Jika Anda menginstal secara lokal, Anda dapat nama apapun sistem email. Jika tidak, pastikan untuk menggunakan nama domain berkualifikasi lengkap. 

Sekarang, perangkat lunak kami terinstal dan siap untuk pengujian dan konfigurasi


Hal pertama yang harus kita lakukan adalah memastikan bahwa versi rkhunter kami adalah up-to-date.

sudo rkhunter --versioncheck

[ Rootkit Hunter version 1.4.0 ]

Checking rkhunter version...
  This version  : 1.4.0
  Latest version: 1.4.0

 
Selanjutnya, kita perlu melakukan pilihan yang sama untuk memperbarui file
File-file ini berisi informasi yang rkhunter pemeriksaan terhadap untuk menentukan apakah sebuah file atau perilaku yang mencurigakan atau tidak


sudo rkhunter --update


Dengan file database kami yang update
kita dapat mengatur properti file awal kami sehingga rkhunter yang dapat mengingatkan kami jika ada dari konfigurasi penting file itu yang berubah. Kita perlu memberitahu rkhunter untuk memeriksa nilai-nilai saat ini dan menyimpannya sebagai nilai-nilai yang dikenal-baik:

sudo rkhunter --propupd
File created: searched for 167 files, found 136

kita siap untuk menjalakan rkhunter, untuk mengecek semua file, apakah ada peringatan untuk perilaku mencurigakan

sudo rkhunter -c --enable all --disable none

untuk melihat peringatkan bisa melihat di log rkhunter

sudo nano /var/log/rkhunter.log


Sumber

Friday, 29 November 2013

1. Download version 5.1.70

wget http://downloads.mysql.com/archives/mysql-5.1/MySQL-server-5.1.70-2.glibc23.x86_64.rpm

wget http://downloads.mysql.com/archives/mysql-5.1/MySQL-client-5.1.70-2.glibc23.x86_64.rpm

wget http://downloads.mysql.com/archives/mysql-5.1/MySQL-devel-5.1.70-2.glibc23.x86_64.rpm


2. Stop service mysql
#service mysql stop


3. move irectory database mysql old and file my.cnf
#mv /var/lib/mysql/ /var/lib/mysql5.1.69
#mv /etc/my.cnf /etc/my.cnf5.1.69


4. remove package mysql
#yum remove mysql-server-5.1.69 mysql-5.1.69 mysql-shared-5.1.69 mysql-libs-5.1.69


5. Install package Mysql 5.1.70
#rpm -ivh MySQL-client-5.1.70-2.glibc23.x86_64.rpm
#rpm -ivh MySQL-server-5.1.70-2.glibc23.x86_64.rpm

#rpm -ivh MySQL-devel-5.1.70-2.glibc23.x86_64.rpm


6. Start Mysql
#service mysql start


7. Cek verion Mysql
#mysqladmin -u root -p version

Server version          5.1.70


success


Monday, 25 November 2013

ERORR

root@debian:/etc/php5# /etc/init.d/apache2 reload
Reloading web server config: apache2apache2: Could not reliably determine the server's fully qualified domain name, using 192.168.5.78 for ServerName

SOLVING

root@debian:~# nano /etc/apache2/httpd.conf

tambahkan kata pada file httpd.conf
ServerName localhost

root@debian:~# /etc/init.d/apache2 reload
Reloading web server config: apache2.

1. First add these two lines to your /etc/apt/sources.list file:
deb http://packages.dotdeb.org squeeze-php54 all
deb-src http://packages.dotdeb.org squeeze-php54 all
2. Now fetch the appropriate GnuPG key:
# wget http://www.dotdeb.org/dotdeb.gpg
# cat dotdeb.gpg | sudo apt-key add -
3. Install PHP 5.4:
# apt-get update
# apt-get upgrade
# apt-get install php5 php5-curl php5-gd php5-mysql php5-cli
4. Sekarang Cek php version :
# root@deb:/# php -v
PHP 5.4.21-1~dotdeb.0 (cli) (built: Nov  2 2013 21:32:49)
Copyright (c) 1997-2013 The PHP Group
Zend Engine v2.4.0, Copyright (c) 1998-2013 Zend Technologies


Saturday, 23 November 2013

Bila menemukan error seperti di bawah ini

root@raden:/usr/lib/php5/20090626# php -v
PHP Deprecated:  Comments starting with '#' are deprecated in /etc/php5/cli/conf.d/ps.ini on line 1 in Unknown on line 0
PHP 5.3.3-7+squeeze17 with Suhosin-Patch (cli) (built: Aug 23 2013 15:06:16)
Copyright (c) 1997-2009 The PHP Group
Zend Engine v2.3.0, Copyright (c) 1998-2010 Zend Technologies
    with Suhosin v0.9.32.1, Copyright (c) 2007-2010, by SektionEins GmbH

untuk menghilankan error tersebut Silakan masuk ke 2 file untuk menghapus line # configuration for php MING module

2 File :
nano /etc/php5/apache2/conf.d/ming.ini
nano /etc/php5/apache2/conf.d/ps.ini

bila sudah restart apache nya
/etc/init.d/apache2 restart

root@raden:/usr/lib/php5/20090626# php -v
PHP 5.3.3-7+squeeze17 with Suhosin-Patch (cli) (built: Aug 23 2013 15:06:16)
Copyright (c) 1997-2009 The PHP Group
Zend Engine v2.3.0, Copyright (c) 1998-2010 Zend Technologies
    with Suhosin v0.9.32.1, Copyright (c) 2007-2010, by SektionEins GmbH

error tersebut sudah hilang,